Is your kitchen in need of a refresh? As you might have noticed, over here we’re all about reuse, and we LOVE a good kitchen makeover.
Before thinking about purchasing a new kitchen, more and more people are taking a DIY approach and working with what they already have, or buying a second-hand kitchen and adding their own personal touch. A lick of paint and a change of handles can completely transform drab units, and is a pocket-friendly alternative to a brand new kitchen. With so many great products out there and so much information, there’s never been a better time to give it a go yourself!
Interior up-cycling guru Kate Holt has documented the whole process in her Kitchen Makeover Blog, and she has some handy tips for achieving your own perfectly painted kitchen cabinets.
Before & After
Picking a Colour
Kate chose to work with Fusion Mineral Paint, a hard-wearing water-based matt paint that requires minimal prep. Other no-fuss brands that achieve a similar finish includes Annie Sloan Chalk Paint and Farrow & Ball Modern Eggshell. After careful consideration, Kate chose a Grey shade which complimented her Corian worktop.
Clean, Sand and Prime
Preparation is key when painting your kitchen cabinets. Making sure the units are squeaky clean will ensure that the paint sticks, and will save you a lot of trouble further down the line. Let a heavy-duty de-greasing product sit on the surfaces for a while, and then get scrubbing! Make sure to get in all the corners – there’s no such thing as too clean.
After this stage, Kate advises spraying the units down using a water and Fusion TSP solution and wiping until spotless. She then sanded the necessary parts (any laminated or shiny panels) and applied Ultragrip – a resin to help the paint stick. Priming isn’t always necessary with Fusion as it’s an acrylic resin based product, but if you think the wood may bleed then use a shellac based primer.
Time to Paint
Many people recommend removing doors and fittings before the painting begins – if you choose to do this then labelling doors is a good idea to avoid a muddle. Then it’s time to pick your tool of choice and get painting!
(Pssst – We also recommend protecting your worktops with rosin or brown builder’s paper)
Half-Way Through
Apply a Top Coat
Although not essential when using Fusion Mineral Paint, a top coat will keep those cabinets looking better for longer. Kate chose shellac based Fusion Tough Coat for this step, wiped on with a sponge or damp cloth. If your using dark colours and want to avoid a milky look then add the top coat between your first and second coat.
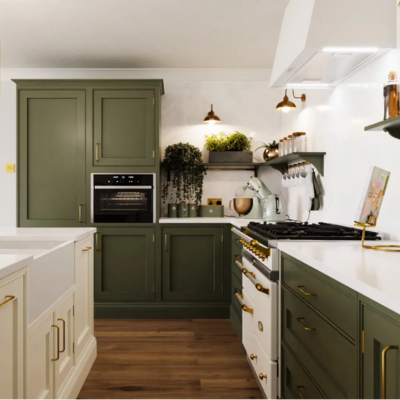
The Finished Kitchen!
The end product looks a million miles away from the original wooden kitchen, and darker colour choice has given the units an ultra-contemporary feel. We hope this blog has convinced someone, somewhere to give their kitchen units a second chance, or think about purchasing a pre-owned kitchen! You can read Kate’s inspiring kitchen makeover blog in more detail here.
Kate is an associate member of The House of Upcycling, the UK’s marvellous leading authority on upcycling for interiors. They are also a unique membership club for professional upcyclers who are challenging the design world to reduce, reuse and recycle.
These talented designer-remakers create unique and functional items for interiors, using materials that they can salvage. Pay them a visit for everything upcycling, including a list of skills classes and a directory of upcycling specialists near you!