
The Oxford English Dictionary defines ‘upcycling’ as the process of reusing waste material to create a product of higher quality or value than the original and to reduce the need for new raw materials.
It’s that simple! When your kitchen cupboards are looking dull or lifeless, a full kitchen renovation isn’t the only option. These projects take time, and if you haven’t got the budget for a total refurbishment, upcycling is a quicker, less expensive alternative.
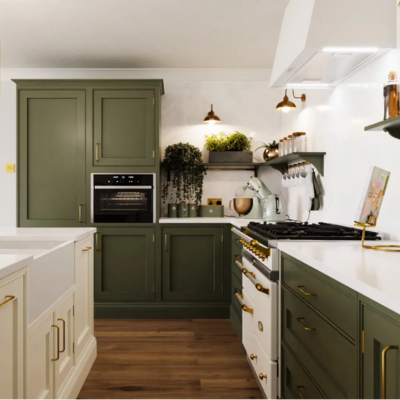
With full creative direction, you can sand, paint and gloss your kitchen cabinets to your heart's content! Let the UK’s number one Kitchen, Bedroom, Bathroom outlet teach you how to upcycle kitchen cabinets the right way.
Equipment & materials list
Before learning how, first, we need to know what. Specifically, what materials, tools and equipment are non-negotiable? Those planning to sand, prime, paint and replace hardware will need the following items:
- Paint
- High-quality paintbrushes (varying thickness/sizes)
- Primer
- Roller
- Surface primer
- Sugar soap and water
- Bucket
- Post-it notes
- Pencil
- Sponge
- Resealable plastic bags
- Finish spray paint
- Hand-held belt sander (optional for seasoned DIYers!)
- Screwdriver
- Grit sandpaper (120-220 grit, preferably)
- Goggles
- Dust mask

1. Remove cabinet hardware
The first step, which may be the most tedious of all, is preparation. Before disassembling, you’ll need to clear out the cupboards completely. Some items (those unopened or in-date groceries) can be relocated elsewhere.
Others that are way out of date (but have been lodging in your cupboards for many years) can finally be thrown in the bin. You’ll be left with only the essentials when it comes time to restock. Then, once your cupboards are empty, it’s time to start removing the hardware.
Using your screwdriver, remove any handles or knobs, placing them into resealable bags. Those who are looking for a particularly smooth reassembly process can assign each cabinet door a number. After removing each piece of hardware from the cabinet door, place the knobs, handles and relevant screws into a resealable bag and label the bag with the assigned cabinet number.
2. Remove doors and clean
Now, it’s time to rid your cabinets of built-up kitchen grime!
Using a water and sugar soap solution and a sponge, give your cabinets a much-needed clean. Dirt is attracted to paint like a moth to a flame, so it’s important to put a little elbow grease into this step for a better end result.
Now your doors are significantly cleaner, you can begin removal. Unscrew each cabinet door from its main unit and, using a pencil, label the doors according to the unit they belong to (the way you did with the hardware).
Again, while this step may take up more time, it’ll make the reassembly process much easier.
3. Sand the cabinet doors and units
If you’re looking for a beautiful wood finish, sanding is the best way to achieve this. Scuffing up the wood means that paint will stick to it more easily. Plus, you’ll be able to get rid of any bumps and chips that stick out like a sore thumb.
Remember: sanding causes a lot of dust, so if you have a garden or a large outdoor area, it’d be better to start this process here. Indoors or outdoors, you should be wearing a dust mask and goggles to protect yourself from dust inhalation.
Start with the smaller areas first. You don’t need to pick up the sander for this. Instead, grab your 120-220 grit sandpaper and wrap it around a dry sponge. Start with the crevices and corners, applying gentle pressure to the more delicate areas of your cabinets.
The goal here is to take your surface from gloss to matte, not to sand down to the bare wood. Now, it’s time for the bigger surface areas. Plug in your hand-held belt sander and sand in the direction of the wood grain. You may end up removing the pencil marks you made earlier (to assign the doors to a unit), so when you do, remember the number and write it on a Post-it note.

4. Apply primer
It’s nearly time to start painting, but there’s one more step to the preparation process: priming! You can use a universal primer, which can come in colours like white and red (but will look great under any colour).
Or, if you are dead set on painting your cabinets a lighter colour, we recommend a white primer: this will make your overcoat pop. Those using darker, more dramatic colours can, instead, purchase a grey primer.
Steer clear or wood primers: these will only work if you do not plan on painting your kitchen cabinets and want a plain wood finish. Similar to the sanding process, DIYers will be better off priming outside to avoid paint splatters all over the kitchen. (Remember to remove the Post-it note, but keep it nearby!)
Taking your first cabinet door, spray the primer using a windscreen wiper motion from each angle. Remember to keep a bucket nearby for painting the sides. Before turning the door over and repeating the process, make sure the first coat is 100% dry.
5. Paint your cabinets
Now, for the fun part! We have a whole guide on how to paint kitchen cabinets, so check that out for our best tips and practices.
Shop for pre-loved kitchens and appliances with Rehome
If you’re still considering a full refurbishment, the UK’s number one Kitchen, Bedroom, Bathroom outlet can help you break down budget barriers.
We’re home to big name brands like Martin Moore, John Lewis of Hungerford and Eggersman, all of whom are offering their pre-loved kitchens for thousands of pounds less than high-street prices. Shop for shaker-style kitchens, complete with classic shaker cabinetry and beautiful kitchen islands. We’ve got new listings in our modern kitchen collection, where you can find signature Mackintosh cabinets with integrated Nobilia appliances.
Whatever you want, we can provide. For pre-loved kitchens at affordable prices, shop with Rehome today.

FAQs
How to update old kitchen cabinets without replacing them?
You can update old kitchen cabinets by repainting, replacing handles and knobs, adding new hinges, or even by applying wallpaper to the panelling. Homeowners can even consider adding under-cabinet lighting for a fresh new look (without the cost of a full replacement).
How to upcycle a cabinet for beginners?
Start by cleaning and sanding the cabinet. Apply a primer, then paint or stain for a fresh look. Swap out old handles for new ones and consider adding decorative moulding.
Can I just paint over my kitchen cabinets?
Yes, but proper preparation is key. Clean the surface, lightly sand to remove any sheen, and apply a primer to help the paint adhere. Use long-lasting paint that’s suitable for kitchen cabinets, such as acrylic or chalk paint, to ensure your hard work pays off!
What is the cheapest way to reface kitchen cabinets?
Painting is, undoubtedly, the most cost-effective way to reface kitchen cabinets. Just follow Rehome’s step-by-step guide, and you, too, can save money!


